Managing CPU usage can be an issue when trying to consolidate multiple databases on to a single server, because if one database starts to hog all the CPU on the server, all the other databases will be affected.
Instance caging was introduced in the Enterprise Edition of Oracle Database 11g Release 2 (11.2) that simplifies the management of CPU usage in consolidation environments. By enabling Resource Manager and setting the CPU_COUNT parameter in each instance, you can limit the maximum amount of cores/threads the instance can use.
Related articles.
Resource Manager has been available in the Oracle database since Oracle 8i and has gone through significant improvements in every major release. You can read more about it here:
Resource Manager is not enabled by default, so it must be enabled by specifying a resource plan before instance caging can take effect. Oracle provide a number of resource plans out of the box.
select plan from dba_rsrc_plans;

PLAN
------------------------------
DEFAULT_PLAN
INTERNAL_QUIESCE
INTERNAL_PLAN
APPQOS_PLAN
DEFAULT_MAINTENANCE_PLAN
ETL_CRITICAL_PLAN
MIXED_WORKLOAD_PLAN
ORA$AUTOTASK_SUB_PLAN
ORA$AUTOTASK_HIGH_SUB_PLAN
DSS_PLAN

10 rows selected.

SQL>
If you have no specific resource management needs within the instance, the simplest solution is to use the default plan.
alter system set resource_manager_plan = default_plan;
Remember, the maximum utilization of each consumer group within a resource plan is a proportion of the total CPU for the instance, specified by the CPU_COUNT parameter. If a consumer group is limited to 50% of the total CPU and the CPU_COUNT is set to 2, then the consumer group is limited to 1 CPU. Keep this in mind when using resource plans that control CPU utilization within the instance.
Remember, on multi-threaded systems the CPU_COUNT relates to threads, not cores.
With the Resource Manager active, you must set the CPU_COUNT for each instance running on the server. The CPU_COUNT parameter is dynamic, but it is not recommended to change it too often, or by too large an amount. The following command shows how to set the parameter.
alter system set cpu_count = 2;
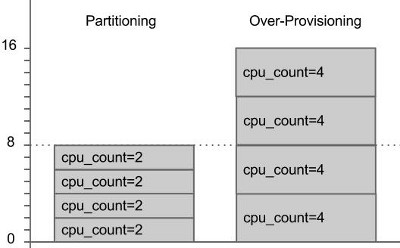
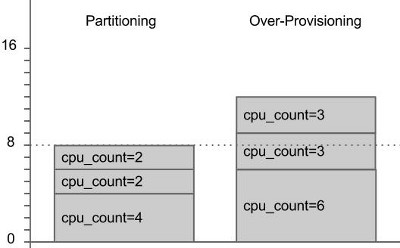
Setting the parameter is easy, but knowing what to set it too can take a little thought. There are two basic approaches:
CPU_COUNT set to value less than the total number of CPUs on the server, but they add up to a value greater than the CPU count of the server. This prevents any one instance hogging all the server CPU, but if all instances are busy at the same time, the server can still get swamped.CPU_COUNT values of all the instances on the server are less than or equal to the total number of CPUs on the server. This way it is unlikely that any one instance will affect the performance of any other instance from a CPU perspective.The diagram below gives an example of the two provisioning methods on a server with 8 threads available for database processing.
The CPU_COUNT can vary for each instance, to indicate their relative performance requirements.
The throttling effect of Resource Manager can be displayed using the CONSUMED_CPU_TIME and CPU_WAIT_TIME columns of the following views.
The CONSUMED_CPU_TIME is the number of milliseconds of CPU time consumed by the consumer group, while the CPU_WAIT_TIME is the time waiting for CPU due to Resource Manager throttling.
select name, consumed_cpu_time, cpu_wait_time
from v$rsrc_consumer_group;

NAME                             CONSUMED_CPU_TIME CPU_WAIT_TIME
-------------------------------- ----------------- -------------
SYS_GROUP                                    45155           226
OTHER_GROUPS                                   310             4
ORA$AUTOTASK_MEDIUM_GROUP                    23805           864
ORA$AUTOTASK_URGENT_GROUP                     3777            17
ORA$AUTOTASK_STATS_GROUP                         0             0
ORA$AUTOTASK_SPACE_GROUP                         0             0
ORA$AUTOTASK_SQL_GROUP                           0             0
ORA$AUTOTASK_HEALTH_GROUP                        0             0
ORA$DIAGNOSTICS                                375            13
_ORACLE_BACKGROUND_GROUP_                        0             0

10 rows selected.

SQL>

alter session set nls_date_format='DD-MON-YYYY HH24:MI:SS';

set linesize 100

select begin_time,
       consumer_group_name,
       cpu_consumed_time,
       cpu_wait_time
from   v$rsrcmgrmetric_history
order by begin_time;

BEGIN_TIME           CONSUMER_GROUP_NAME            CPU_CONSUMED_TIME CPU_WAIT_TIME
-------------------- ------------------------------ ----------------- -------------
.
.
.
03-NOV-2012 14:31:20 ORA$AUTOTASK_HEALTH_GROUP                      0             0
03-NOV-2012 14:31:20 ORA$DIAGNOSTICS                                0             0
03-NOV-2012 14:31:20 ORA$AUTOTASK_STATS_GROUP                       0             0
03-NOV-2012 14:32:20 SYS_GROUP                                    515             0
03-NOV-2012 14:32:20 OTHER_GROUPS                                   0             0
03-NOV-2012 14:32:20 ORA$AUTOTASK_MEDIUM_GROUP                      0             0
03-NOV-2012 14:32:20 ORA$AUTOTASK_URGENT_GROUP                      0             0
03-NOV-2012 14:32:20 _ORACLE_BACKGROUND_GROUP_                      0             0
03-NOV-2012 14:32:20 ORA$AUTOTASK_SPACE_GROUP                       0             0
03-NOV-2012 14:32:20 ORA$AUTOTASK_SQL_GROUP                         0             0
03-NOV-2012 14:32:20 ORA$AUTOTASK_HEALTH_GROUP                      0             0
03-NOV-2012 14:32:20 ORA$DIAGNOSTICS                                0             0
03-NOV-2012 14:32:20 ORA$AUTOTASK_STATS_GROUP                       0             0

420 rows selected.

SQL>
If you are using the multitenant architecture, you have a number of options.
CPU_COUNT parameter value.CPU_COUNT is set. You could just set the DEFAULT_PLAN in one or more PDBs.CPU_COUNT at the instance level, and set the DEFAULT_PLAN in the PDB.Here is an example of using instance caging in a lond-PDB setup.
-- Manually set the CPU count in the root container.
conn / as sysdba
alter system set cpu_count=2;

-- Enable the default plan in the PDB.
alter session set container = pdb1;
alter system set resource_manager_plan = default_plan;
You now have the whole instance caged to 2 CPUs, regardless of how many CPUs are available on the server.
You will see below there are multitenant variations on using the CPU_COUNT parameter to control CPU usage of a PDB. Even when you are using this, the whole instance will be caged based on the CDB-level CPU_COUNT value.
The sections on using the CPU_COUNT and CPU_MIN_COUNT inside PDBs have been moved to a separate article.
For more information see:
Hope this helps. Regards Tim...
Back to normal view: https://oracle-base.com/articles/11g/instance-caging-to-manage-cpu-usage-in-oracle-database-11gr2