8i | 9i | 10g | 11g | 12c | 13c | 18c | 19c | 21c | 23c | Misc | PL/SQL | SQL | RAC | WebLogic | Linux
Home » Articles » Linux » Here
Linux Firewall (iptables, system-config-firewall)
This article covers basic Linux firewall management, with specific reference to the information needed for the RHCSA EX200 certification exam. Extra information is required for the RHCE EX300 certification exam, which will be supplied by another article.
Remember, the exams are hands-on, so it doesn't matter which method you use to achieve the result, so long as the end product is correct.
Related articles.
Installation
Most installations will include the firewall functionality. If you need to manually install it, the following commands will install the IP4 and IP6 firewall functionality. In this article we will only consider the IP4 settings.
# yum install iptables

# yum install iptables-ipv6
Make sure the service is started and will auto-start on reboot.
# service iptables start
# chkconfig --level 345 iptables on
You can check the current status of the service using the following command.
# service iptables status
Table: filter
Chain INPUT (policy ACCEPT)
num  target     prot opt source               destination
1    ACCEPT     all  --  0.0.0.0/0            0.0.0.0/0           state RELATED,ESTABLISHED
2    ACCEPT     icmp --  0.0.0.0/0            0.0.0.0/0
3    ACCEPT     all  --  0.0.0.0/0            0.0.0.0/0
4    ACCEPT     tcp  --  0.0.0.0/0            0.0.0.0/0           state NEW tcp dpt:21
5    ACCEPT     tcp  --  0.0.0.0/0            0.0.0.0/0           state NEW tcp dpt:22
6    ACCEPT     tcp  --  0.0.0.0/0            0.0.0.0/0           state NEW tcp dpt:80
7    ACCEPT     tcp  --  0.0.0.0/0            0.0.0.0/0           state NEW tcp dpt:443
8    REJECT     all  --  0.0.0.0/0            0.0.0.0/0           reject-with icmp-host-prohibited

Chain FORWARD (policy ACCEPT)
num  target     prot opt source               destination
1    REJECT     all  --  0.0.0.0/0            0.0.0.0/0           reject-with icmp-host-prohibited

Chain OUTPUT (policy ACCEPT)
num  target     prot opt source               destination

#
To disable the firewall, run the following commands.
# service iptables stop
# chkconfig iptables off
system-config-firewall
The GUI screen to control the firewall is available from the menu (System > Administration > Firewall) or can be started from the command line using the system-config-firewall command. If it is not already present, it can be installed using the following command.
# yum install system-config-firewall
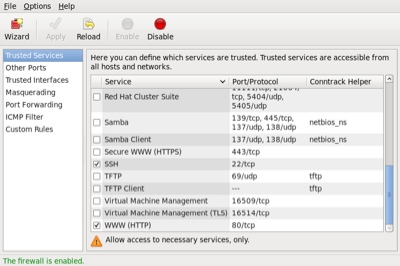
Once started, the toolbar provides buttons to allow the firewall to be enabled/disabled. You can also configure basic trusted services, such as SSH, FTP and HTTP, by putting a tick in the appropriate checkbox and clicking the "Apply" button on the toolbar.
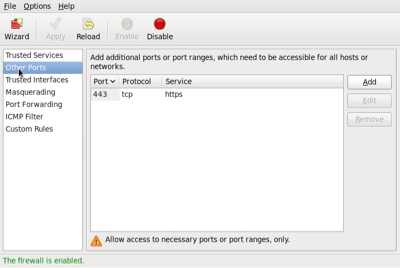
The "Other Ports" section allows you to open ports that are not covered in the "Trusted Services" section.
system-config-firewall-tui
The TUI utility is similar to the GUI utility shown above, but it feels incredibly clumsy in comparison. If it is not already present, it can be installed using the following command.
# yum install system-config-firewall-tui
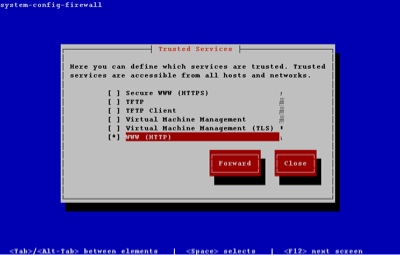
Running the system-config-firewall-tui command from the command line produces the top-level screen, allowing you to enable/disable the firewall. Use the space bar to toggle the setting, the tab key to navigate between buttons and the return key to click them.

To alter the Trusted Services, tab to the "Customize" button and press the return key. Amend the list using the arrow and space keys.
You can close out of the customization section at any point. The other sections of the GUI tool are available by clicking the "Forward" button on each successive screen.
iptables
In addition to the GUI and TUI interfaces, the firewall rules can be amended directly using the iptables command. There are vast number of parameters, so I will just focus on the elements necessary for the RHCSA exam.
The firewall consists of chains of rules that determine what action should be taken for packets processed by the system. By default, there are three chains defined:
INPUT: Used to check all packets coming into the system.OUPUT: Used to check all packets leaving the system.FORWARD: Used to check all packets being routed by the system. Unless you are using your server as a router, this chain is unnecessary.
Each chain can contain multiple explicit rules that are checked in order. If a rule matches, the associated action (ACCEPT and DROP being the most common) is taken. If no specific rule is found, the default policy is used to determine the action to take.
Since the default policy is a catch-all, one of two basic methods can be chosen for each chain.
- Set the default policy to
ACCEPTand explicitlyDROPthings you don't want. - Set the default policy to
DROPand explicitlyACCEPTthings you do want.
The safest option is to set the default policy to DROP for the INPUT and FORWARD chains, so it is perhaps a little surprising that the GUI and TUI tools set the default policies to ACCEPT, then use an explicit REJECT as the last rule in these chains.
# iptables -L -v --line-numbers
Chain INPUT (policy ACCEPT 0 packets, 0 bytes)
num   pkts bytes target     prot opt in     out     source               destination
1       11   812 ACCEPT     all  --  any    any     anywhere             anywhere            state RELATED,ESTABLISHED
2        0     0 ACCEPT     icmp --  any    any     anywhere             anywhere
3        0     0 ACCEPT     all  --  lo     any     anywhere             anywhere
4        1   100 ACCEPT     tcp  --  any    any     anywhere             anywhere            state NEW tcp dpt:ssh
5        0     0 REJECT     all  --  any    any     anywhere             anywhere            reject-with icmp-host-prohibited

Chain FORWARD (policy ACCEPT 0 packets, 0 bytes)
num   pkts bytes target     prot opt in     out     source               destination
1        0     0 REJECT     all  --  any    any     anywhere             anywhere            reject-with icmp-host-prohibited

Chain OUTPUT (policy ACCEPT 6 packets, 744 bytes)
num   pkts bytes target     prot opt in     out     source               destination
#
This works fine, but if you accidentally get rid of the last rule in the chain you are in trouble. For this reason, for the remainder of this section I will assume that the default policy for INPUT and FORWARD is DROP. For the OUTPUT chain I will assume any packets originating from the system are safe, so I will ACCEPT any outgoing packets.
The default policy for a chain is set using the "-P" flag. In the following example, assuming no specific rules were present, all communication to and from the server would be prevented.
# iptables -P INPUT DROP
# iptables -P FORWARD DROP
# iptables -P OUTPUT DROP
Warning: If you are administering the firewall via SSH, having a default INPUT policy of DROP will cut your session off if you get rid of the explicit rules that accept SSH access. As a result, it makes sense to start any administration by setting the default policies to ACCEPT and only switch them back to DROP once the chains have been built to your satisfaction. The following example temporarily sets the default policies to ACCEPT.
# iptables -P INPUT ACCEPT
# iptables -P FORWARD ACCEPT
# iptables -P OUTPUT ACCEPT
The next thing we want to do if flush any existing rules, leaving just the default policies. This is done using the "-F" flag.
# iptables -F
Now we need to define specific rules for the type of access we want the server to have. Focusing on the INPUT chain, we can grant access to packets in a number of ways.
# Accept packets from specific interfaces.
iptables -A INPUT -i lo -j ACCEPT
iptables -A INPUT -i eth0 -j ACCEPT

# Accept packets from specific hosts.
iptables -A INPUT -s 192.168.122.1 -j ACCEPT

# Accept packets from a specific subnet.
iptables -A INPUT -s 192.168.122.0/24 -j ACCEPT
iptables -A INPUT -s 192.168.122.0/255.255.255.0 -j ACCEPT

# Accept packets from specific host, checking the MAC address.
iptables -A INPUT -s 192.168.122.1 -m mac --mac-source 52:54:00:91:6A:B3 -j ACCEPT

# Accept packets from a specific port.
iptables -A INPUT -p tcp --dport 22 -j ACCEPT

# Accept packets from connections in a specific state.
iptables -A INPUT -m state --state ESTABLISHED,RELATED -j ACCEPT

# Combinations of all of the above.
iptables -A INPUT -i eth0 -p tcp -s 192.168.122.0/24 --dport 22 -m state --state NEW,ESTABLISHED -j ACCEPT
Once the explicit rules are defined, we need to set the real default policies.
# iptables -P INPUT DROP
# iptables -P FORWARD DROP
# iptables -P OUTPUT ACCEPT
Rule and policy definitions take effect immediately.To make sure they persists beyond reboot the current configuration must be saved to the "/etc/sysconfig/iptables" file using the following command.
# service iptables save
If you are using Fedora, you may need to use the following command instead.
# iptables-save > /etc/sysconfig/iptables
As you can imagine, even in a simple configuration this process can get a bit long-winded, so it makes sense to combine all the elements of the firewall definition into a single file so it can be amended and run repeatedly. Create a file called "/root/firewall.sh" with the following contents. Think of this as your starting point for each server.
#!/bin/bash

# Set the default policies to allow everything while we set up new rules.
# Prevents cutting yourself off when running from remote SSH.
iptables -P INPUT ACCEPT
iptables -P FORWARD ACCEPT
iptables -P OUTPUT ACCEPT

# Flush any existing rules, leaving just the defaults
iptables -F

# Open port 21 for incoming FTP requests.
iptables -A INPUT -p tcp --dport 21 -j ACCEPT

# Open port 22 for incoming SSH connections.
iptables -A INPUT -p tcp --dport 22 -j ACCEPT
# Limit to eth0 from a specific IP subnet if required.
#iptables -A INPUT -i eth0 -p tcp -s 192.168.122.0/24 --dport 22 -m state --state NEW,ESTABLISHED -j ACCEPT

# Open port 80 for incoming HTTP requests.
iptables -A INPUT -p tcp --dport 80 -j ACCEPT
# Open port 443 for incoming HTTPS requests. (uncomment if required)
#iptables -A INPUT -p tcp --dport 443 -j ACCEPT

# *** Put any additions to the INPUT chain here.
#
# *** End of additions to INPUT chain.

# Accept any localhost (loopback) calls.
iptables -A INPUT -i lo -j ACCEPT

# Allow any existing connection to remain.
iptables -A INPUT -m state --state ESTABLISHED,RELATED -j ACCEPT

# Reset the default policies to stop all incoming and forward requests.
iptables -P INPUT DROP
iptables -P FORWARD DROP
# Accept any outbound requests from this server.
iptables -P OUTPUT ACCEPT

# Save the settings.
service iptables save
# Use the following command in Fedora
#iptables-save > /etc/sysconfig/iptables

# Display the settings.
iptables -L -v --line-numbers
Make the file executable.
# chmod u+x /root/firewall.sh
Run the file to set the required firewall rules.
# /root/firewall.sh
iptables: Saving firewall rules to /etc/sysconfig/iptables:[  OK  ]
Chain INPUT (policy DROP 4457 packets, 522K bytes)
num   pkts bytes target     prot opt in     out     source               destination
1        0     0 ACCEPT     tcp  --  any    any     anywhere             anywhere            tcp dpt:ftp
2     1394  116K ACCEPT     tcp  --  any    any     anywhere             anywhere            tcp dpt:ssh
3        0     0 ACCEPT     tcp  --  any    any     anywhere             anywhere            tcp dpt:http
4        8   400 ACCEPT     all  --  lo     any     anywhere             anywhere
5    96358  138M ACCEPT     all  --  any    any     anywhere             anywhere            state RELATED,ESTABLISHED

Chain FORWARD (policy DROP 0 packets, 0 bytes)
num   pkts bytes target     prot opt in     out     source               destination

Chain OUTPUT (policy ACCEPT 50890 packets, 2890K bytes)
num   pkts bytes target     prot opt in     out     source               destination
#
The iptables command also allows you to insert (-I), delete (-D) and replace (-R) rules, but if you work using a file as described above, you never need to use these variations.
Quick Database Setup
If you are using the server as an Oracle database server, you will probably want to make sure the SSH and Oracle listener ports are accessible. You could lock these down to specific source IP addresses, but for a quick setup, you could just do the following, where "1521" is the port used for the listener.
# service iptables start
# chkconfig iptables on
# iptables -A INPUT -p tcp --dport 22 -j ACCEPT
# iptables -A INPUT -p tcp --dport 1521 -j ACCEPT
# service iptables save
# service iptables status
For more information see:
- RHEL6 Security_Guide : Firewalls
- RHEL6 Documentation
- Linux man pages
- RHCSA and RHCE
- Linux Firewall (firewalld, firewall-cmd, firewall-config)
Hope this helps. Regards Tim...